

In this article, we will share how to enable remote assistance in Windows 10. The Windows Remote Assignment function is to give control or permission to other people to be able to control the PC and remotely. This is done with the help of the internet network. Usually, this is done to fix problems that occur on your PC without having to come to your place.
So, in this tutorial, we will show you two ways on how to enable Remote Assistance in Windows through a firewall.
How to Enable Remote Assistance in Windows
First: Enable Remote Assistance in System Properties
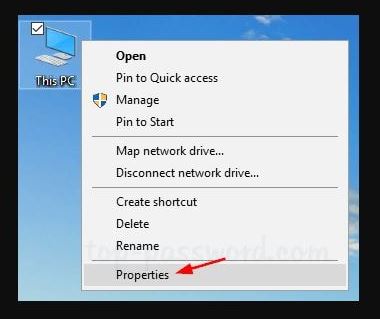
1. Right-click on “my computer” or This PC on your desktop, then click Properties. view image

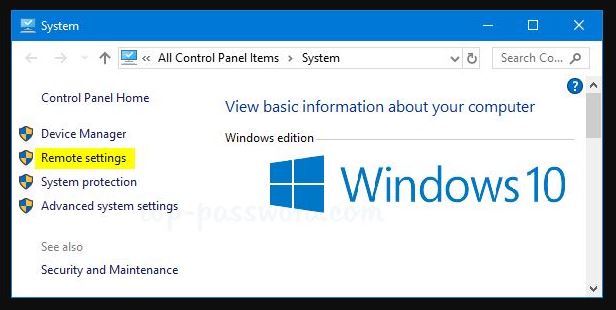
2. Look at the left side of the window, there is a “Remote settings” menu, click there. Look the picture.

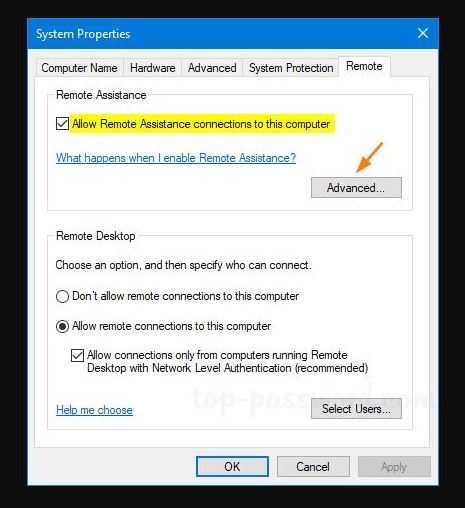
3. In the “System Properties” window, select the remote tab and make sure you have checked “Allow Remote Assistance connections to this computer“. Next, click on Advanced, See the picture below.

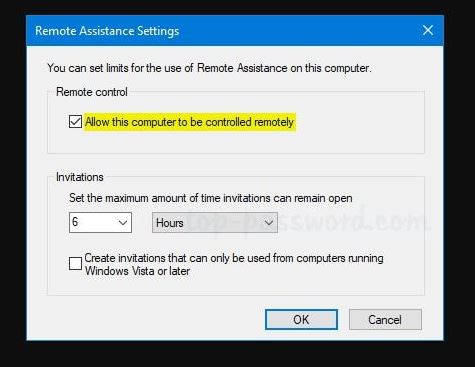
4. Then, if you check “Allow this computer to be controlled remotely“, then other people can see your computer screen but it cannot control or act on your computer.
More: How to Screen Mirroring iPhone to PC with 3 Simple Steps
More: How To Free Up Space On iPhone

5. Next, click on “OK” to save your settings.
Second: Enable Remote Assistance Windows Using Command Line or Registry Editor
1. Open the registry editor by pressing the Windows key + R, the RUN box will open, write “regedit” and Enter. Then browse the following registry key:
HKEY_LOCAL_MACHINE\SYSTEM\CurrentControlSet\Control\Remote Assistance
2. To enable Remote Assistance, double-click on the DWORD entry fAllowToGetHelp on the right, set the value to 1. If you want to deactivate the remote assistance, please set the value to 0 again.
3. Then, double-click on the DWORD entry fAllowFullControl set the value to 1. This is if you want to give permission to others to take over your computer.
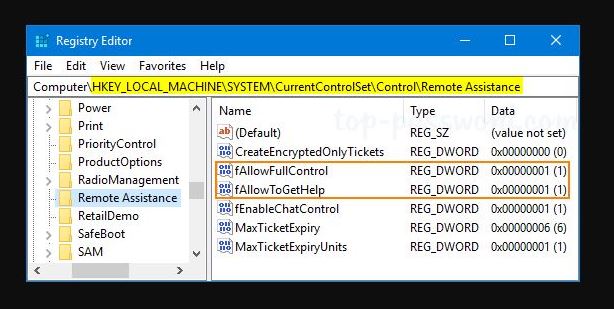

4. If everything is finished, close the Registry Editor. Consider the following picture.
If you want to make this change through the Command Prompt, run or write the command below to activate Windows Remote Assistance:
reg add “HKLM\System\CurrentControlSet\Control\Remote Assistance” /v fAllowToGetHelp /t REG_DWORD /d 1 /f
reg add “HKLM\System\CurrentControlSet\Control\Remote Assistance” /v fAllowFullControl /t REG_DWORD /d 1 /f
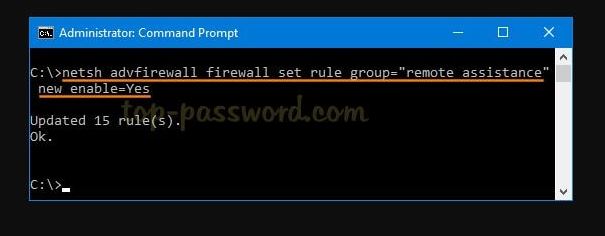
How to Activated Remote Assistance Windows Through Firewall
How or what should I do to activate Windows Remote Assistance? This way, type the command below in the Command Prompt, pay attention to the following picture.
netsh advfirewall firewall set rule group=”remote assistance” new enable=Yes

Reference: top-password.com